Introduction
In the blog below, I've explained how one can establish site-to-site connectivity between two popular cloud providers AWS and Azure.
Expectation
You are asked to set up a VPN connectivity between AWS and Azure environment as transferring data over the internet has concerns related to security and compliance requirements.
The goal is to test the connectivity using RDP/PING protocol from a VM in Azure to an EC2 instance in AWS over the private network and vice versa.
Architecture Diagram
The below architecture diagram will help you understand the different components and the connectivity between them.
Here are the connectivity service components mapping between AWS and Azure.
AWS VPC --> Azure Virtual Network
AWS Route Table --> Azure Route Table
AWS Customer Gateways --> Azure Local Network Gateways
AWS Virtual Private Gateways --> Azure Virtual Network Gateways
AWS Site-to-Site VPN Connections --> Azure Connections
Steps
The below 14 steps will help you achieve the above architecture. You can skip if some of the components are already deployed. But remember the network address spaces should not overlap with each other.
1. Create a Virtual Network in Azure
Create the Virtual Network with address space 10.10.0.0/16
Add a Subnet with CIDR 10.10.1.0/24
2. Create a Gateway Subnet
While creating the gateway subnet use the subnet 10.10.2.0/24
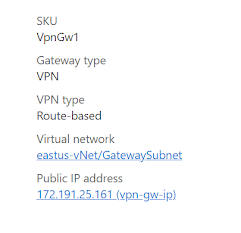
3. Create an Azure Virtual Network Gateway
While creating the Virtual Network Gateway, choose the settings below.
Take note of the public IP, it is needed while creating the customer gateway in AWS.
Note: This will take 15-30 minutes to deploy. Let's create some of the AWS components in between.
4. Create a VPC in AWS
Create a VPC using address space 172.17.0.0/16
Use the Subnet CIDR as 172.17.1.0/24
5. Create the Customer Gateway
Use the Azure VPN Gateway public IP address while creating the customer gateway.
6. Create the Virtual Private Gateway
Create the virtual private gateway using amazon default ASN.
Once created, attach it with the VPC created earlier.
7. Create a Site-to-site VPN
While creating the VPN, choose the already-created virtual private gateway and customer gateway.
Note: This will take 5-10 minutes to provision.
once provisioned the tunnel status would be Down.
Make sure the static route to Azure is there in the VPN connection.
8. Download the VPN configuration
This will download a text file having VPN connection configuration details for establishing the IPsec tunnel like a pre-shared key, VPN Gateway public IP address, etc.
9. Create Azure Local Network Gateway
Use the VPN Gateway Public IP address received in the VPN configuration file earlier to create the local network gateway.
10. Create a connection
Use the pre-shared key, virtual network gateway, and the local network gateway to create the connection.
11. Create Route Table
Create a route table in Azure and associate it with the Default subnet.
Add a static route to the AWS subnet by the add route option.
12. Associate subnet, add Route at AWS route table
Associate the subnet with the route table available for the VPC
Add the route to Azure local CIDR.
Enable the route propagation to the virtual private gateway.
13. Check the connection and tunnel status
Check the Connection state. It should be successful and stay in a connected state.
The tunnel status in AWS will be up too. Time to test the connectivity.
14. Test the connectivity
The VM's network interface shows the effective routes to the AWS environment.
Create a Windows Server virtual machine in the Azure virtual network for testing.
Connect to the Azure VM, open the PowerShell window, and test the connection by executing Test-NetConnection -ComputerName 172.17.1.101 -Port 3389
Launch a Windows Server EC2 instance in the VPC.
Connect to the AWS VM, open the PowerShell window, and test the connection by executing Test-NetConnection -ComputerName 10.10.1.4 -Port 3389
For those comfortable with Linux, deploy an Ubuntu virtual machine in both environments. Test the connectivity using ping 171.17.1.104 and ping 10.10.1.4 respectively.